


Igloo Drawing
With regards to getting by in probably the cruelest conditions. Individuals must think of imaginative strategies to persevere, notwithstanding the realistic chances. Igloos are an extraordinary illustration of this, as these unique designs worked of snow and ice assisted with keeping the occupants inside protected and warm against the harsh environment. Igloo Drawing & Anubis Drawing or other drawing ideas for other drawing lovers
These designs were worked by Inuit individuals, principally in Canada and Greenland. However, they have caught minds all over the planet, turning into a fantastic image. Figuring out how to draw an igloo is an extraordinary method for planning one without getting your hands cold!
This will be the ideal instructional exercise for anybody captivated by these shrewd designs. So snatch your #1 warm refreshment and prepare to leave on this very excellent bit-by-bit guide on the most proficient method to attract an igloo, with only six stages!
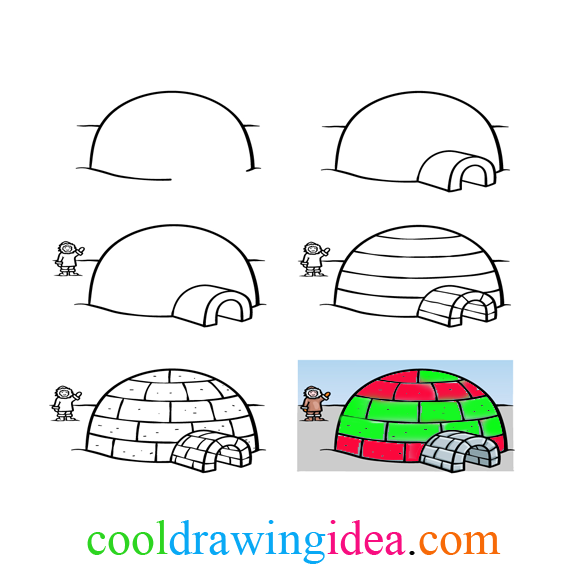
Stage 1 – Igloo Drawing
These designs are known for typically having an adjusted vault plan, which is the very thing we went with in this aide on the best way to draw an igloo. You can begin this by defining a bent boundary for the domed external construction of the igloo.
Then, draw a marginally bent, wavy line along the base left-hand edge of the igloo, and afterward, draw a more limited one along the base right-hand edge. There will be a vast space between them where the entryway will go later.
Polish off this step by drawing a few short, somewhat uneven lines for the beginning of the scene foundation behind this igloo. When these viewpoints are drawn, we can proceed to the manual’s second step to add more.
Stage 2 – Presently, draw the entry of the igloo
An igloo wouldn’t be a lot of purpose without an opening to enter and leave it, so we will add that perspective to your igloo, attracting this following stage. The entry of the igloo can be attracted to seem to be a topsy turvy horseshoe shape. You can then define a straight boundary in from the lower part of the right-hand base edge internal.
Then, define a bent boundary for the passage part of the entry, and afterward, give the passage a level base with a straight line. When this entry looks as it does in our reference picture, you will be prepared for stage 3!
Visit www.cooldrawingidea.com for the latest drawing ideas
Stage 3 – Draw the individual who lives in this igloo
Igloos don’t simply show up suddenly, so there must be an individual that makes and lives in it. That is who we will attract this third step of our aide on the most proficient method to draw an igloo! The individual we will draw is wearing conventional clothing. You can begin this by drawing a round plan comprised of a few sharp lines.
These lines will frame the shaggy opening of the hood this individual is wearing. Then, at that point, utilize a few introductory lines for the coat they’re wearing. The arm on the left is brought up in a cordial wave and has a thick glove toward its finish. Polish them off by drawing a grinning face and by adding the legs and shoes they’re wearing.
Stage 4 – Next, draw the singular segments of the igloo structure
Igloos are regularly created utilizing firmly stuffed blocks of ice and snow. We will begin drawing this viewpoint for your igloo, attracting this following stage. To do this, define a few marginally bent boundaries along the fundamental part of the igloo.
Then, define a few straight boundaries moving outward on the entry passage and polish off with lines across the inside of the horseshoe-formed entrance. We will then, at that point, be prepared for the following stage, where you will polish off these construction subtleties!
Stage 5 – Add the last subtleties to your igloo drawing
You began drawing the singular snow ‘blocks’ making up the design in the past step of this aide on the most proficient method to draw an igloo, and this part will see you polishing them off. To do this, draw a few columns of vertical lines down from the different columns of the igloo. Which will polish off the vibe of having individual block segments.
You can add some surface specifications by adding a few little spots, generally all through the igloo. You will be prepared for the last step. Whenever you have drawn these angles and subtleties! You could likewise add an individual pizazz to the picture by additionally drawing extra subtleties or foundation components to polish it off. How might you want to polish off this picture before the last step?
Stage 6 – Polish off your igloo drawing with a variety
That carries you to the last step of this igloo drawing. We will polish off for specific varieties. As you might envision, we went with bunches of cool tones for this picture. This assists with selling the chilly, frosty setting of the climate and construction.
We involved a few light blues and grays for the frosty design of the igloo. And we utilized various shades for the sky and ground encompassing the construction. We then went with browns for the dress of the individual remaining by it, and these assists give a touch of variety with differentiating.
Do this to take your igloo attraction to a higher level.
Make this very fabulous igloo sketch surprisingly better with the assistance of these helpful hints! This drawing of an igloo shows an Eskimo character remaining behind the scenes. They are a serious little piece of the synthesis, yet you could stress them more. One approach to doing this is placing them in the picture’s forefront. You might keep the plan precisely as it shows up in the drawing and make them bigger.
It could likewise be amusing to add extra companions for this person to spend time with! What are a few different postures you could make? Adding a few additional human characters is one thought, yet you could add a few creature characters to the scene. Some creatures live in such chilly conditions that you could utilize them. A few more modest models would be a few penguins or perhaps something like a snow fox. You could likewise go for a few more enormous creatures like wolves and perhaps a polar bear.
What are a few different creatures that you could add to the scene?
A genuine igloo would be made of ice and different materials. You could utilize a portion of your #1 craftsmanship devices and mediums to depict this frozen surface for the igloo. You would maintain that it should look light and practically straightforward so that milder artistry mediums would be ideally suited. For this reason, watercolor paints and shaded pencils would be great mediums. However, they are a long way from the specific ones.
Whenever you have added every one of your options and messed with your #1 artistry instruments, you could polish off with a foundation for your igloo sketch. The foundation might be a reasonably basic while as yet being powerful. It could simply be a frigid scene depicted for certain wavy lines. That would be a straightforward approach to making a foundation. However, you could likewise add elements, for example, mountains or perhaps a blizzard.
There are so many ways to get innovative with it, so how might you polish off the picture?
Your Igloo Drawing is Finished!
You have arrived at the finish of this aide on the most proficient method to draw an igloo, and you have effectively dominated every six stages! We trust that dealing with this guide was a tomfoolery experience for you, making it more straightforward than you might have expected. Dominating this drawing is only the beginning, nonetheless. You can move it along by adding your wonderful subtleties, thoughts, and variety of decisions.
How might you add your imaginative pizazz as you polish off this image?
If you lived it up with this aide, you’d need to visit our site for additional aides like it. We transfer new ones frequently, so make sure to continue to check in! While your astounding igloo drawing is finished, you can show it off by sharing your creation on our Facebook and Pinterest pages. It will be perfect for perceiving how it ended up!


Add Comment